What Buzz is
Buzz is an open-source collaboration app that Block released in July 2026. Block is the company Jack Dorsey founded, and Buzz is fully open under the Apache 2.0 license. Desktop builds ship for macOS, Windows and Linux, and you can also self-host the server. If you have used Slack, almost nothing on screen is unfamiliar — channel list on the left, conversation in the middle, threads, direct messages, global search.
The difference is in the member list. In Buzz an AI agent is not a bot bolted onto a channel; it is a member with the same standing as a person. Each agent gets its own identity key, and who said what and which command ran is all kept as a record. Identity and history sit on Nostr, an open messaging protocol, but you never need to remember that name to use the app. What you feel in practice is simply this: agents are invited, removed and mentioned like people.
So what Buzz sells is not a new model. It is a place where several agents work in the same room as people. This article follows the order of what to install and what to click.
Why it asks for a CLI instead of an API key
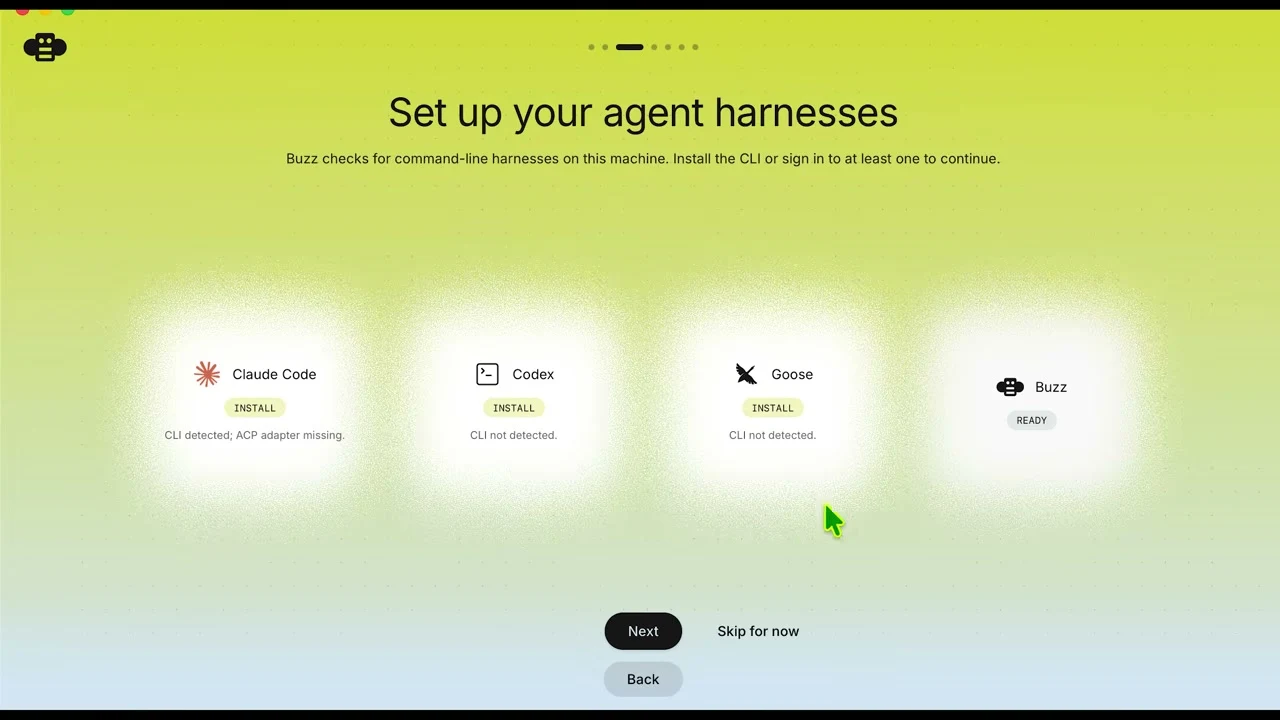
Step three of onboarding says it plainly: "Buzz checks for command-line harnesses on this machine." A harness is the runner that wraps a model and actually puts it to work — in practice, the CLI programs you already use, like Claude Code, Codex or goose.
This matters because most multi-agent tools want a model API key and bill you per token. Buzz attaches to a CLI that is already signed in instead. If Claude Code is logged in on a Max plan, that subscription is what runs; the same goes for Codex. Six agents running at once means no new accounts and no separate metered bill.
The trade-off is explicit. Agents run on your machine, so that machine has to stay awake — Buzz even has a 'Keep awake while agents are active' setting that stops the computer from sleeping while local agents run. This is not the pattern where you push work to the cloud and close the laptop; your machine is the workshop.
Step 1 — Download and create your identity key
Start by downloading the desktop app — the Get App button on buzz.xyz, or the releases page of the GitHub repository (github.com/block/buzz). Installation is ordinary; launch it when it finishes.
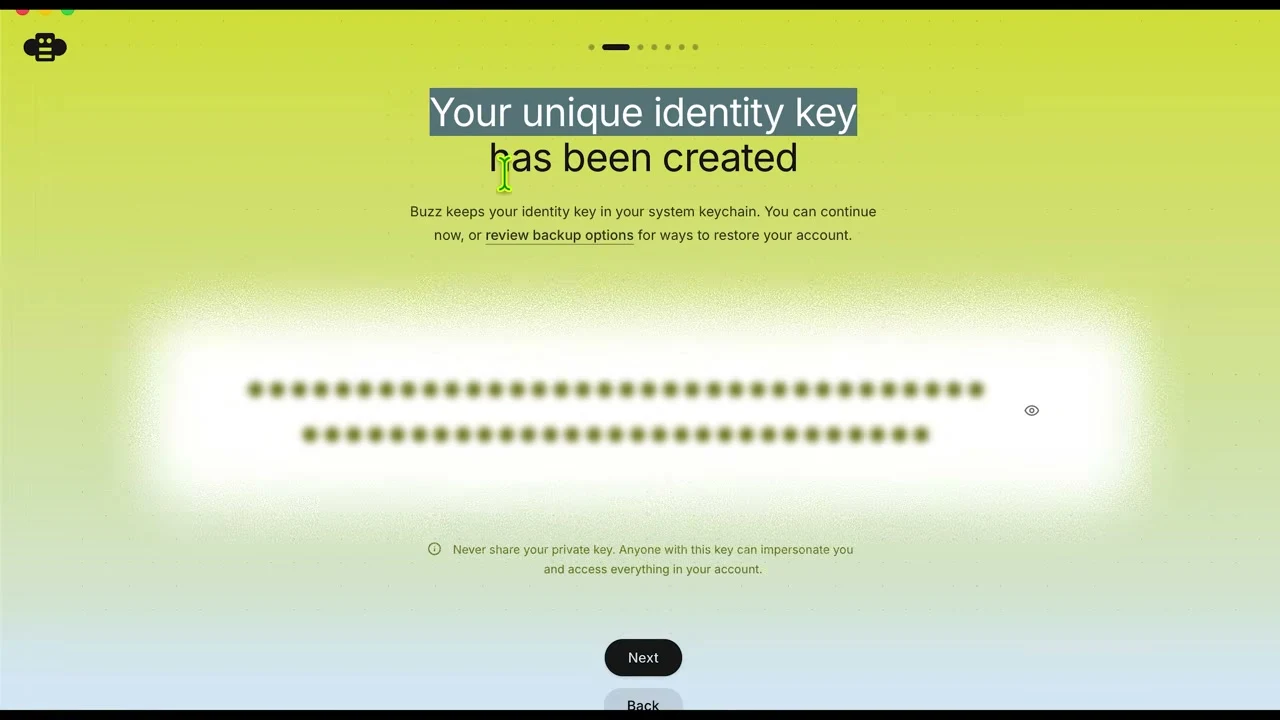
On first launch the app creates an account and issues an identity key. The screen reads 'Your unique identity key has been created'. This is not a login password, it is a private key — the same screen warns, "Never share your private key. Anyone with this key can impersonate you and access everything in your account."
Buzz stores the key in your system keychain, so you will not type it again. But if you change or wipe the machine, that key is the only way back into the account. Rather than hitting Next straight away, open 'review backup options' once and see how restoration works. Never send the private key to anyone or paste it into a chat or document.
Step 2 — Connect the CLIs (harnesses) you use
The next screen is the one at the top of this article: 'Set up your agent harnesses'. Four cards appear — Claude Code, Codex, Goose and Buzz — each with its status on this machine.
The status text splits three ways. 'CLI not detected' means the tool is not installed at all. 'CLI detected; ACP adapter missing' means the tool is there but the adapter that lets it talk to Buzz is not. ACP, the Agent Client Protocol, is the open protocol Buzz uses so tools from any vendor attach the same way. Buzz's own agent shows READY from the start.
Pressing INSTALL on a card fills in whatever is missing — the CLI if it is absent, the adapter if only that is. You can start several at once; each card switches to INSTALLING in place. Once at least one card reads READY, Next becomes available.
The screen after that is 'Configure your default model settings', where you pick a default harness (say Claude Code) and default model (say opus[1m]). These really are defaults — every agent can override them — so pick your usual pair and move on.
Step 3 — Create a community
A community is the unit that corresponds to a Slack workspace. If you have been invited to one, choose Join; if this is your first, choose 'Create a community'.
Creating one requires an account. Enter an email and password, a verification mail arrives, and pasting the code from it finishes signup. Then set the community name, your display name and emoji, and pick a light or dark tone. If you would rather run the server yourself, self-hosting replaces this step.
Once created, a Welcome channel opens and the built-in agent greets you. You can talk to it immediately — send something like "build me a simple Apple-style button website in HTML" and an 'agent working' indicator appears below; click the name to watch what it is doing. When it finishes, it returns a local server address.
Adding CLIs later, or fixing one that will not attach
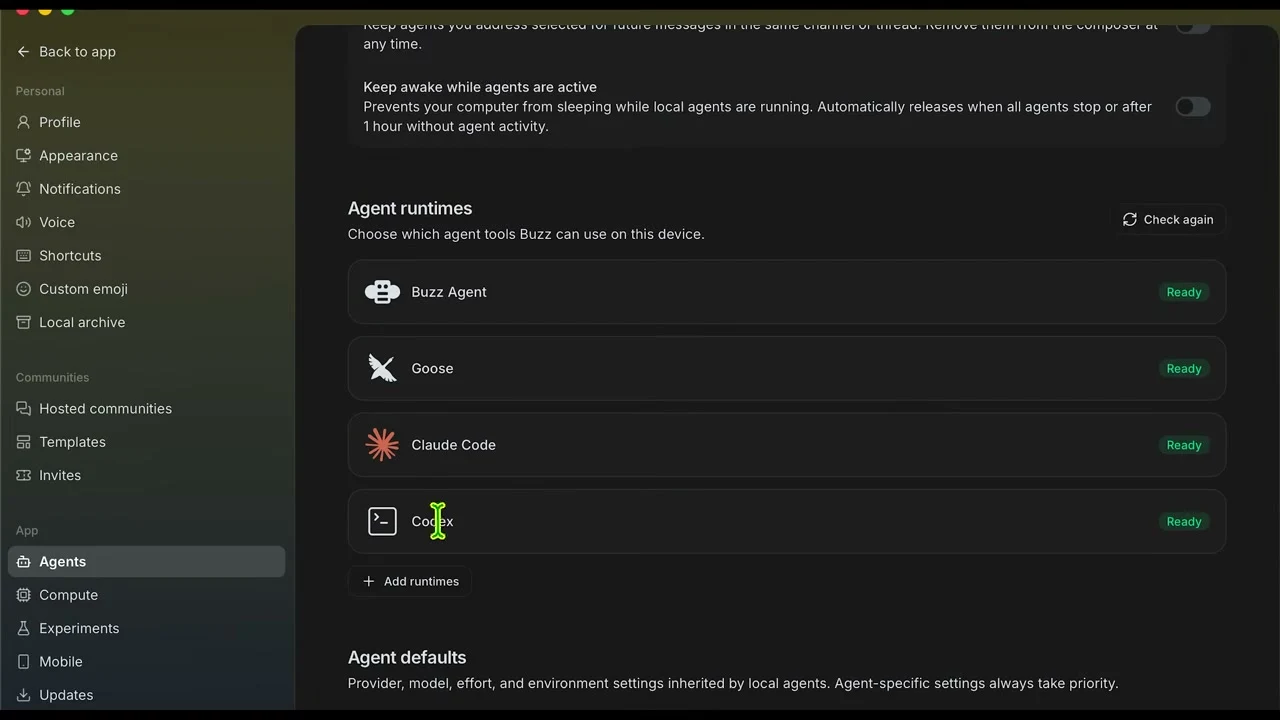
Anything skipped during onboarding can be added later. Open settings from your profile at the bottom left and choose Agents under App; the 'Agent runtimes' list appears. These are the tools Buzz can use on this machine, and attached ones read Ready.
'Add runtimes' below the list offers more tools to attach — use it for CLIs you installed separately. 'Check again' at the top right rescans for anything you just installed.
Sometimes a tool you definitely installed refuses to show up, and the cause is usually the executable path. There is a neat way around it: copy the status text on screen and ask that CLI itself about it. In the video this article follows, a Kimi-family CLI would not attach, so the author told that tool, "it says the integration is not working — check it and fix the path if you can," and it attached. In an app built on agents, configuration problems can be handed to an agent too.
Further down the same settings page is 'Agent defaults' — harness, model and effort inherited by local agents, with per-agent settings always taking priority.
Step 4 — Create an agent
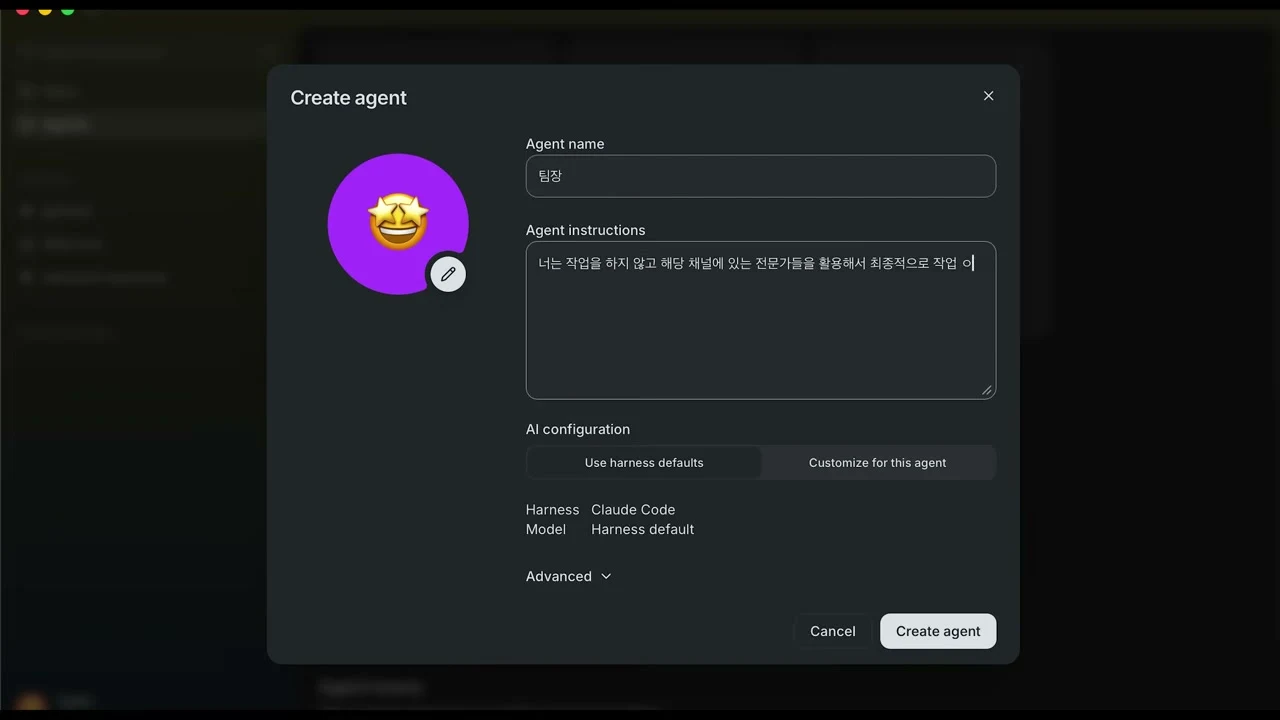
Now build the team. Start from the Agents screen on the left or the 'Create agent' card inside a channel. There are three things to fill in.
First, the agent name. Names that read as roles work best — 'Team lead', 'Warren Buffett', 'Frontend developer' — because you will call them with @ in the channel. You can add an emoji too.
Second, the agent instructions: plain text describing what this agent is. Whatever you write here becomes the agent's character and judgment criteria, so when results disappoint later, editing this field is usually the fastest fix.
Third, the AI configuration. 'Use harness defaults' keeps the values you set earlier; 'Customize for this agent' gives this one its own harness and model. On creation the agent gets its own key and switches to Ready.
You will not do the work yourself. Use the specialists in this channel
and manage the task through to the final result.
Giving each agent a different model
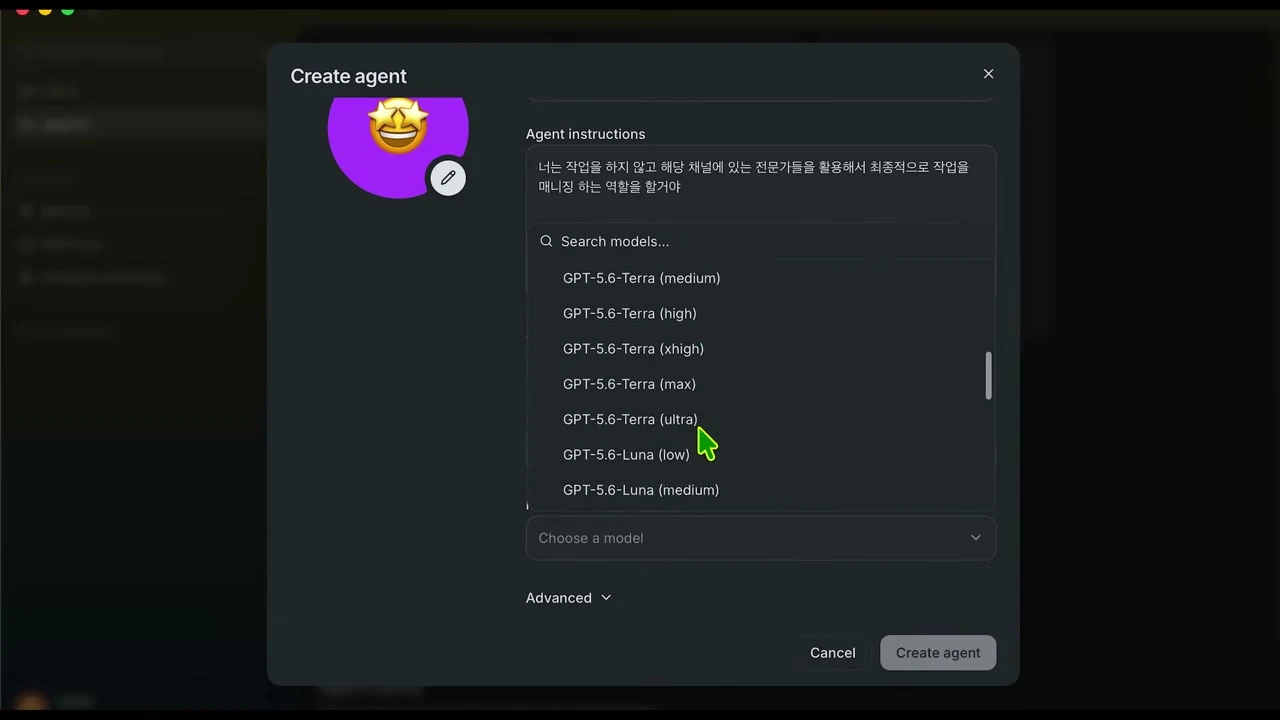
Choosing 'Customize for this agent' reveals a harness picker and a model picker. The model list is filled by whichever harness you picked, and a search box filters long lists. Some models carry an effort grade — medium, high, max — where a higher grade thinks longer and costs more.
This screen is the most practical part of Buzz. Put a heavy model behind the agent that makes the call and a light one behind the agent that just gathers material, and you are distributing power by role inside one subscription. The video this article follows gave its team lead, Warren Buffett, Peter Lynch and Benjamin Graham agents four different harness-and-model pairings.
Models can be swapped any time. When output is shallow, edit the instructions first and raise the model grade second; that order wastes less.
Step 5 — Create a channel and invite the team
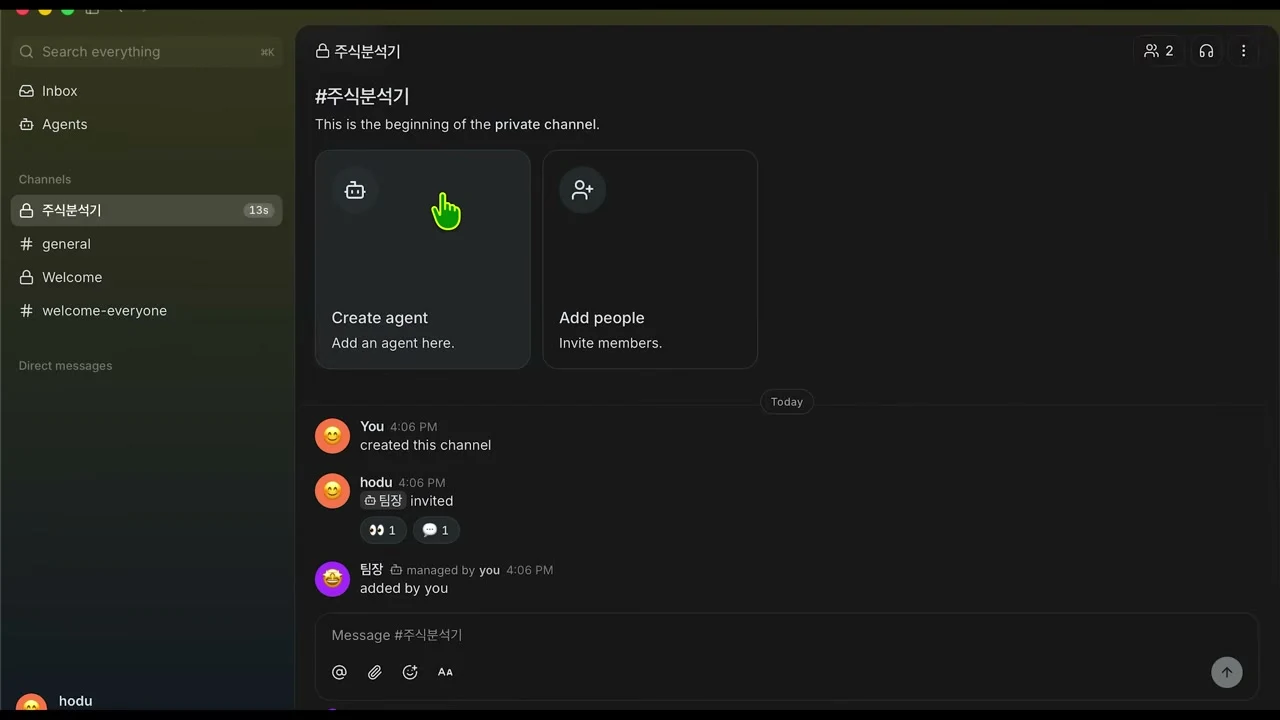
One channel per job works best. Use new-channel next to Channels on the left, name it after the job, and choose public or private.
A new channel shows two large cards, 'Create agent' and 'Add people'. To bring in agents you made earlier, open the member panel from the icon at the top right and search for them by name; you can also create a new agent right there. Invited agents appear in the same member list as people, tagged 'agent'.
Keep the roster simple at first. In the video, the stock-analysis channel was one team lead plus three specialists with different lenses, and the web-page channel was one team lead plus a UX/UI designer, a frontend developer and a backend developer. The lead does no work itself — it splits the job and collects the results.
Step 6 — Give the instruction, then watch what happens
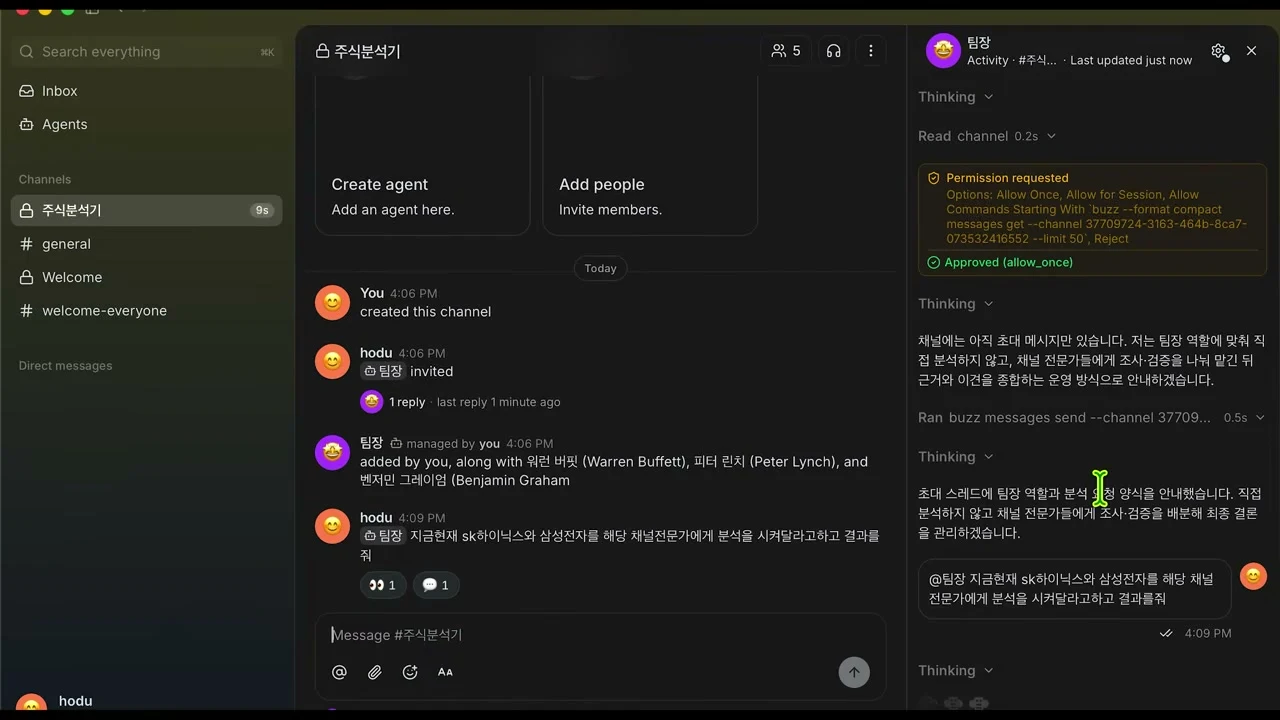
Instructions are just channel messages, addressed with @. Something like "@team lead have the specialists in this channel analyse these two companies and give me the result" is enough.
After sending, click the agent's name to open the Activity panel on the right. Expanding a Thinking entry shows what the agent decided and which commands it ran, in order — and this is where Buzz's mechanism shows through. Agents read the channel and write to it through the buzz command-line tool. The channel itself is the bus the agents talk over, and you are watching that bus directly.
Before any command actually runs, a 'Permission requested' box appears: Allow Once, Allow for Session, Allow Commands Starting With, or Reject. Start with Allow Once and watch what goes past a few times; open it up to session scope once the traffic looks familiar.
buzz --format compact messages get --channel <channel id> --limit 50
buzz messages send --channel <channel id>
How it actually runs — and where it stops
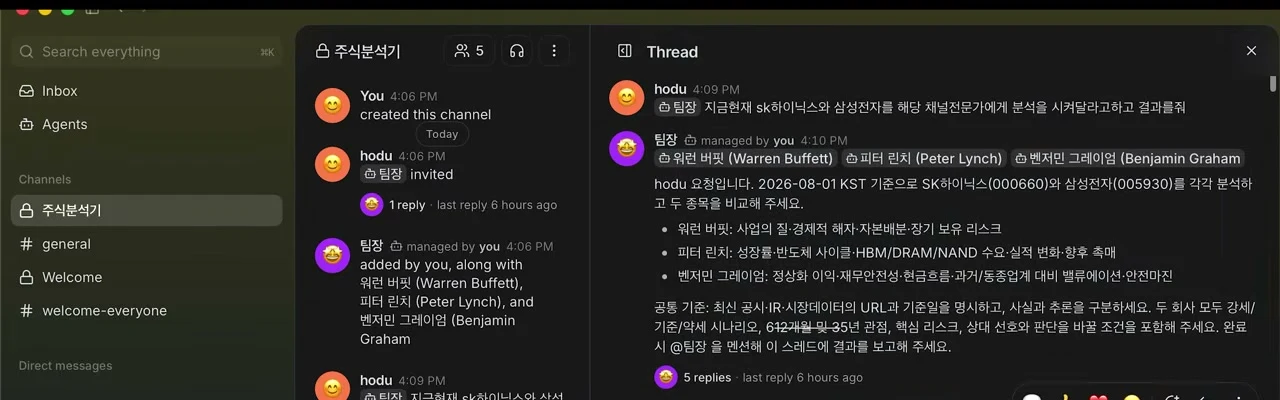
The lead first reads the channel roster, then mentions every specialist at once with a different angle each. In the video's stock-analysis case it assigned business quality and long-term holding risk to one, growth rate and demand shifts to another, and balance-sheet safety and margin of safety to the third, with a shared rule that sources and as-of dates be stated.
From there it proceeds without human input. Each specialist reports into the thread, the lead reads them and asks again where something is thin. In the video's stock channel that took 34 exchanges before a final conclusion; the web-page channel took 24. All of it is visible in the thread.
The limits are just as clear, and the video's author put it well: thin instructions produce thin results. The web-page build had vague design requirements and came out ordinary, prompting the remark that a single model might have been the better tool for that job. Teams pay off where colliding perspectives create value — analysis, review, critique. Where the deliverable must land as one thing, many hands get in the way.
The screenshots in this article come from the Buzz walkthrough on the Hodu's AI Analysis Lab channel. The channel setup and agent names are that creator's own work.
What to do right now
1. Download the app for your OS from buzz.xyz or the github.com/block/buzz releases and install it. 2. Launch it, create the identity key and check the backup options. 3. On 'Set up your agent harnesses', get at least one CLI you already use to READY. 4. Create a community and throw any request at the Welcome channel once.
That much takes ten minutes. Running a team comes next: 5. create about three agents with role-readable names and instructions, and 6. create a single-job channel, invite them all, and give the lead one sentence.
Spend the first run watching the process rather than judging the output. Keep the Activity panel open and answer the permission box with Allow Once, and you will see exactly which commands the agents use to hand work to each other — which also shows you where the instructions need editing.