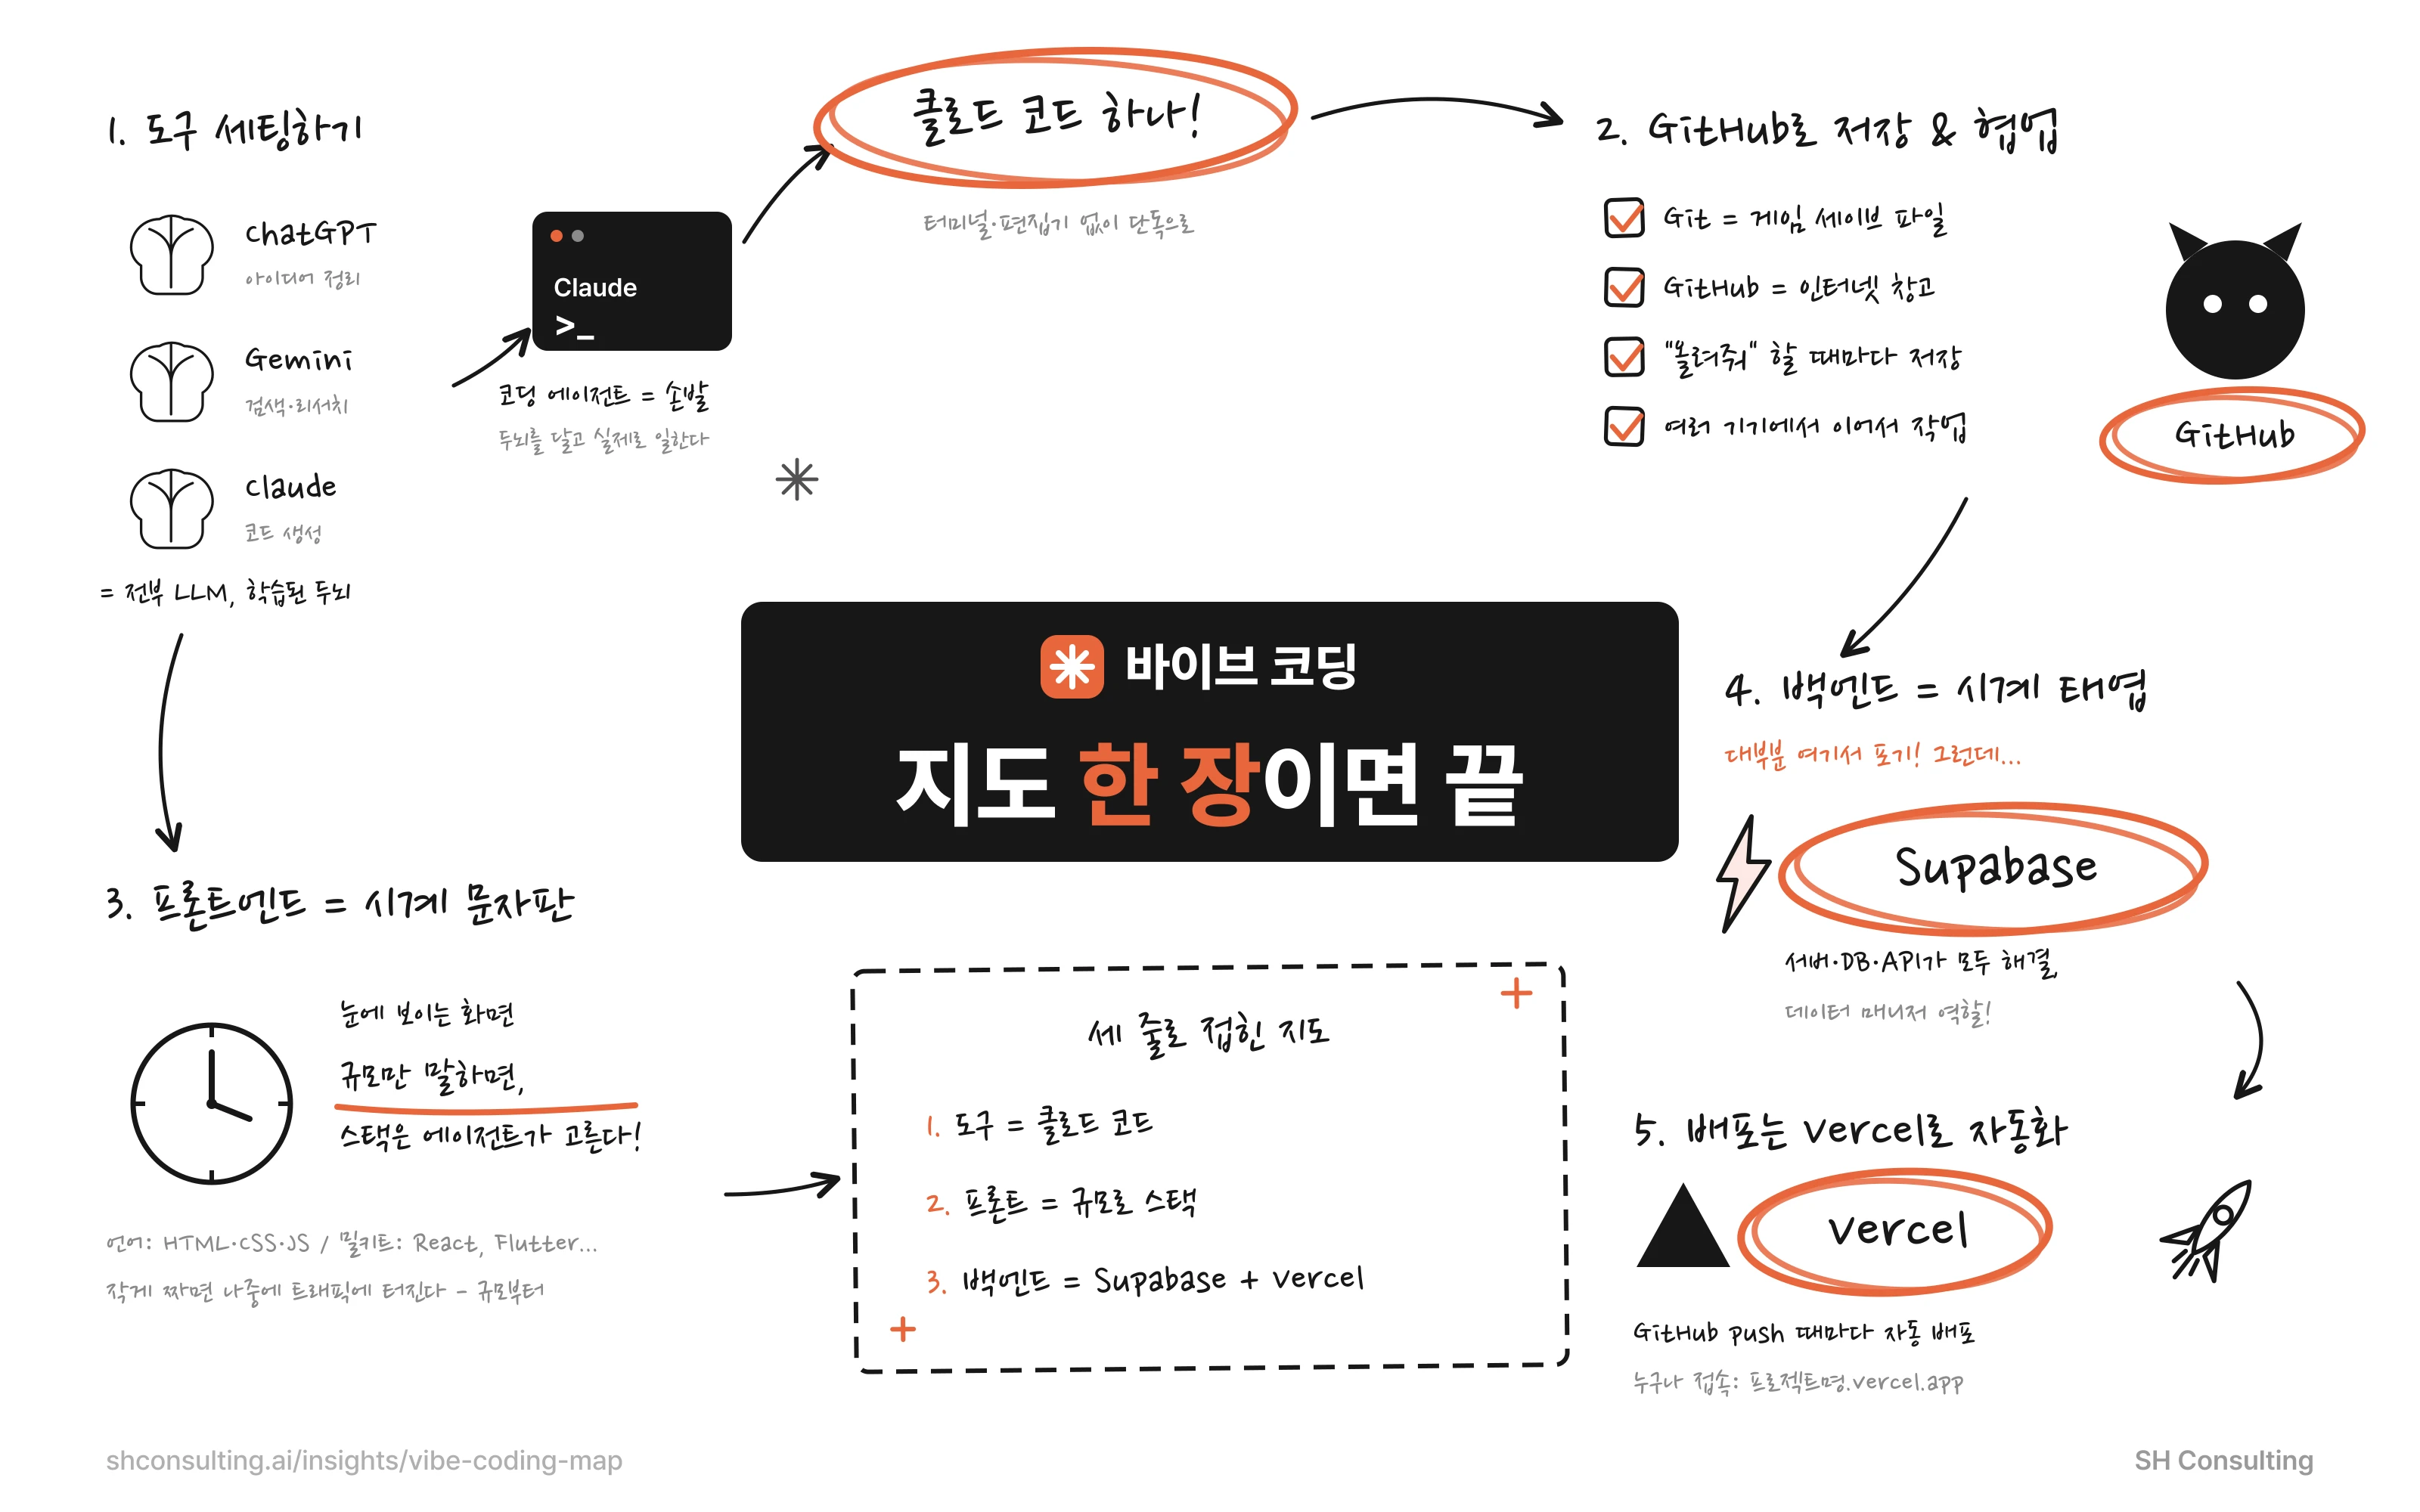
What vibe coding is, and why the map comes first
Vibe coding means telling an AI, in natural language, what you want built — instead of learning a programming language and typing the code yourself. Say 'make me a one-page intro site' and the AI writes the code, shows its work, and gives you a live preview of the finished screen. You decide what to build and set direction; the AI does the typing.
Yet people new to coding often quit before they start, because the tool names and concepts feel foreign. The real problem isn't that any single concept is hard — it's the absence of a whole picture of how these things mesh into one finished site. Without a map, even the clearest explanation of each spot leaves you lost at every step.
So before memorizing how each tool works, unfold the whole map first. It has three big blocks: (1) which tool you build with, (2) how you make the visible screen (the frontend), and (3) how you fill in the part that handles data behind the screen (the backend). Walk these three in order and vibe coding, start to finish, comes into view at a glance.
LLM and coding agent: the brain and the hands
First, separate two words. An LLM (Large Language Model) is a 'brain' trained on enormous amounts of data. ChatGPT, Gemini, and Claude are all LLMs. It can answer, write, and reason about code, but on its own it cannot directly create or edit files on your computer. It exists only as words in a chat window.
What puts hands on that brain and makes it actually work is the coding agent. Taking the LLM's judgment, the coding agent creates files on your machine, edits code, runs commands, and checks results. A thinking brain (the LLM) plus moving hands (the agent) — only together do they become vibe coding. The thing you actually install and use is this coding agent.
There are several coding-agent products with different approaches. If you want to swap in various LLMs, a tool like Cursor is convenient. But this map takes the simplest path and explains everything around Claude Code, whose output has been strong lately.
Setting up the tools: yesterday's complexity, today's simplicity
Setup used to be complicated. You opened a black screen full of English commands — the 'terminal' — to install unfamiliar programs, separately installed a preview editor (Visual Studio Code, or VS Code), and even set up Git, which keeps an undo history, all through commands in that black screen. Much of it you installed by rote, without knowing what it was.
One term here: the terminal is a window where you command the computer with typed text instead of mouse clicks. Even the pretty Windows/Mac screens we use are just a comfortable cover over something that originally ran on such commands. Early coding tools lacked that comfortable cover, so you had to handle the black screen directly.
Now the PC version of Claude Code replaces all of this on its own. With no separate terminal or editor, you install it, log in, and get chat, coding, and preview inside one window. To install: search 'Claude Code' on Google, go to the official download page, and download and run the installer for your computer (Windows/Mac). Once installed, launch it, log in with your Claude account, and in the top-left of the window choose the 'Code' tab rather than the chat tab to open the coding screen. Type instructions in Korean (or any language) in the chat box, and code gets written with a result preview shown right inside.
How to think about cost
There's a point to be honest about. Tools that write code for you usually require a paid subscription. To use the actual coding (the Code tab) in Claude Code, you may need a Pro-or-higher paid plan.
But change the comparison and the judgment shifts. Hiring a developer or outsourcing to build a single site normally costs at least several million won (the video cites over 2 million won). A subscription costs far less, and with that one subscription you can build several sites. Start on a cheaper plan, and move up to a higher tier when you get serious about building a service.
Reframe 'it costs money' as 'how much it saves versus outsourcing,' and it pencils out as a reasonable investment in a fast-changing era. For a solo builder who makes and runs a service alone, it effectively swaps one developer's salary for a tool subscription.
Git and GitHub: the save file and the online warehouse
Once the tool is installed, you need a place to save your work. Every time Claude Code edits code, that change should be saved so you can roll back if something breaks. The thing that plays the role of a game's save file is Git. Macs mostly have it by default; Windows may not, so you install it once (get the installer from git-scm.com, leave every option at its default and just click Next to finish, then restart Claude Code).
GitHub is Git with a 'hub' attached — a service that puts your Git-saved history into an online warehouse. If Git is saving inside your own computer, GitHub is the warehouse where that history lives on the internet. Connect it and you can back code up online, continue work across devices, and later publish your site to the internet.
To connect: sign up on GitHub, return to Claude Code, open the Connect menu from the plus (+) button next to the input box, choose GitHub, and authenticate with the account you just made. After that, every time you say 'upload what I've done so far to GitHub,' the code at that moment is saved. Just remember it's not automatic every instant — it saves when you ask it to.
Frontend and backend: the watch face and the gears
Now you build the site, and a site splits into two parts. A watch makes this easy to grasp: there's the visible face (hands and numbers) and the gears turning behind it. For the watch to run, you need both. A website is the same — the visible screen is the frontend, and the part behind it that stores and processes data is the backend.
The frontend is the screen you see. Originally you wrote it in languages like HTML, CSS, and JavaScript, and layered on a 'framework' (React, Flutter, React Native — like a meal kit that pre-bundles common features). The many names are intimidating, but in vibe coding you only need to know they exist.
The key is the order. First gauge the scale of your service. A simple subscription service, say, isn't large and stores little data. Tell Claude Code that scale and ask it to build with a matching language and setup, and the agent picks a stack that fits. If you don't like it, just ask for something else. This matters because a setup meant for a small project may not hold up when traffic surges later. Building to the right scale from the start is exactly why this step counts.
Build me a simple one-page company intro site.
Tell me first which stack and language you'll use,
and keep it a light setup that fits this small scale.
The backend wall and two managers: Supabase and Vercel
The frontend comes out without much trouble. The next part is the problem. To add sign-up and a board to your intro page, a screen alone won't do — you need a backend that stores and processes data. And this is where most people who never learned to code give up, because the backend involves a lot: a server program, a database, APIs, deployment, ports.
To make even a single sign-up work, you need a data store to hold member info, plus code that lets the screen and the store talk to each other. In the past, for this you had to rent a server (a computer) from something like Amazon Web Services, upload your code to that server, install web-server software, and connect a domain — a whole complicated chain.
Two managers now handle that chain for you. One is Supabase — a 'data manager' that renting a server, creating a database, and holding data all in one. The other is Vercel — a 'deployment manager' that puts your finished site on the internet. It's enough to understand that these two take over the complicated process that used to exist.
Connecting Supabase: sign up and log in at supabase.com (you can use your GitHub account), and create a New Project. Generate the database password with the Generate button and write it down separately. Pick Seoul as the region if you're in Korea. The moment you create it, an empty backend (server) really does get built. Now, from the Connect button at the top or the API keys in settings, copy two things — the project URL (your backend address) and the public key (the key) — paste them into Claude Code, and say 'connect the site I just made to this Supabase.' It writes the connection code and even the statements to create the data table. Paste those statements into Supabase's SQL Editor and Run them, and the table appears. Because the key is like a password, never expose it to others; the safe move is to ask Claude Code to open the dedicated file for keys and register it there.
Deploying with Vercel: the site you've built so far runs only inside your computer (in YouTube terms, edited but not yet uploaded). Go to vercel.com and log in with 'Continue with GitHub,' and it links straight to your GitHub warehouse. Click Add New, then Project, pull in the site repository you made, and hit Deploy. Wait a moment and you get a public internet address like 'projectname.vercel.app.' Now anyone in the world can view the site even when your computer is off. Better yet, every time you fix code in Claude Code and push it to GitHub, Vercel automatically refreshes the site to the latest version. That's why it's called a deployment manager.
The map folds into three lines (and the next map)
That is the whole map of vibe coding. From setting up tools, to building the screen, to filling in the data behind it, to deploying it on the internet — one full loop. Now you only need to instruct Claude Code and the site is ready to be made.
The recap fits in three lines. One, the tool is Claude Code. Two, for the frontend, state the scale of your service and hand off the language and stack. Three, for the backend, hand it to Supabase (data) and Vercel (deployment). Hold these three lines in your head and, when an unfamiliar term shows up, you can place it on the map at once.
The next map moves from 'it gets made' to 'how do I get it made better.' Concepts like harness, MD (instruction docs), skills, connect, API, and agent appear there. The names look hard, but they layer onto the map you've already unfolded, so taken in order they aren't. This piece distills Part 1 of the Honjabs channel's 'one-map guide to vibe coding' for beginners.